We are now well into 2013, and the Chinese New Year holiday has just started. Anyone involved with commercial electronics will know what an inconvenience that can be, but if anyone deserves a holiday, it is the Chinese workers! I for one am not going to begrudge them some time off to see their loved ones. This seems like a good time to take stock of what has happened since my last post, and what my intentions are for 2013.
A Sad Goodbye
As 2012 came to a close, I received some bad news. My good colleague and close personal friend Simon Allen of Intravention Electronics passed away unexpectedly. He was only in his mid 40s, and not much older than me. It takes something like this to make you think about your own mortality, and how fleeting life is. Simon and I had come together when a mutual friend of ours was going through a difficult time. We had known each other for some time, but didn't realise we were in the same business.
Since then we had worked together on several projects - Simon was a great sounding board for my ideas and an excellent "sanity" checker. When Simon passed away we were working on a couple of commercial products. It is a great sadness to me that Simon took with him so much good humoured knowledge and experience.
That rather took the wind out of my sails, forcing me to drop a lot of stuff I was working on. Obviously I don't want to go into details here, but I am now considering whether it might not be the right time to move back into permanent employment rather than being a freelance.The recession is dragging on, and life as a freelancer isn't looking too good here.
Onwards...
Anyway, as they say, life goes on. I finally got around to buying a new calculator! After writing many words on the subject I finally put my hand in my pocket and bought an HP-35S. I could write an in-depth review about what it does and doesn't do. I don't think I need to though, all I can say is that I wish I had bought one long ago. It doesn't have some of the facilities my old HP-28S has, but in all honesty I can't see myself performing matrix operations on a pocket calculator now. The HP-35S actually looks and feels like an engineering tool rather than a toy. It has enough of the old-school look and feel without being an antique. Perfect.
Part of me still wants a true old-school looking calculator with a nice fast ARM processor and OLED screen though...
So What About the LCR Meter?
A good question. The design has been through a couple of revisions since I last wrote about it. Expanding the current and voltage range of the AD chip I was using has proven quite effective but rather complicated to execute.
A thought struck me - if I were designing this on a clean sheet of paper, what would I do? After thinking about it, I have gone back to the drawing board. Rather than hack stuff onto the AD5933, how about using an FPGA, with separate ADC and DAC? That would allow me to generate higher resolution, allow me much better control over the signal generation and analysis, plus it would allow me to configure it as an arbitrary signal generator, plus audio spectrum analyser. If you are going to do feature creep, do it properly!

12 February 2013
2 October 2012
6.002X version 2, and MITx: 6.00x Introduction to Computer Science and Programming
6.002x Revisited (Briefly)
My review of MIT's 6.002X electronics course seems to have been well received, and the lectures are is now part-way through their second run-through. I was disappointed to see that not much has changed. The videos are still of generally poor quality and slightly confused.There is one change of note though. You may remember that one of my criticisms was in the area of answer entry. You often had to type in a horrible sequence of variables on a single line, which may or may not have resembled your answer. Getting a red cross meant you had to try again, not knowing whether your answer was wrong, or just your data entry. I suggested that the LaTeX formatting engine used in the questions could be used, to display your answer in a clearer format. I am pleased to say they have done exactly that!
Answers are now converted on-the-fly to a much clearer mathematical expression on the screen. Excellent stuff, and a big green tick for that!
MITx: 6.00x Introduction to Computer Science and Programming
It is now a couple of decades since I formally studied Computer Science, so I thought I would stick my head around the metaphorical lecture room door and see what has changed. To be fair, 6.00x has only been running a day, but there are some points worthy of comment. The 6.002x people should sit up and take note.Firstly, technical quality. Rather than use a disembodied voice, we get to see the lecturer close-up on screen, with a microphone close by. On some of the videos I saw, the audio bit-rate was highly variable; some were 192kbit/s quality, others were closer to 32kbit/s. For the most part though, he is clearly audible and his presentation has been tailored to a single viewer rather than a full lecture theatre.
Secondly, the diagrams and so on have been prepared beforehand and are of a very good standard. Unlike the scruffy hand-drawn notes in 6.002x. Using these pre-drawn diagrams probably saves 10-15% of lecture time alone, and smooths the lecture's flow in general.
One particularly nice touch is the mention of Alan Turing's name. A man who is increasingly seen as the father of computer science, and whose name has been comparatively unknown for too long.
So far so good, I think I will stick with this one and get to grips with Python.I doubt it will take over from C in my toolkit any time soon, but it is certainly gaining in popularity.
7 September 2012
The London Underground Map - as a PCB?
http://london-underground.blogspot.co.uk/2012/09/the-tube-map-as-radio-circuit-board.html

How brilliant is that! A working radio, laid out as a real tube map. I bet the stray capacitance is an absolute swine though.
The designer of the original tube map, an engineering draftsman named Harry Beck, is widely thought to have based the classic London Underground tube map on electric circuit diagrams. Wiki disagrees, but he was an engineering draftsman, so must have been at least been heavily influenced by wiring schematics.
The same designer has also done this. Not quite sure what to make of it: http://www.designboom.com/weblog/cat/16/view/23447/yuri-suzuki-technology-will-save-us-denki-puzzle.html
20 June 2012
MIT 6.002x Circuits & Electronics: Tries Hard, Could Do Better.
I hope this goes some way to explaining where I have been
for the last few months.
MIT 6.002x Circuits and Electronics
6.002X is the online version of the respected Massachusetts
Institute of Technology course 6.002 “Circuits and Electronics”. It has just
completed its first run-through, and I have been one of the first "guinea
pig" students taking it.
Full Term Report.
When I was at school, like most children I used to get
regular school reports sent home to my parents. The first page consisted of
“advice to both parents and teachers” informing them that vague and unhelpful
clichés such as “could do better” or “tries hard” should be not be used and
that parents should be given more useful comments. After working my socks off
and (I thought) doing really rather well in my class, this eleven year-old’s
very first term’s report said:
"Tries
hard, could do better."
As you will see, it seems appropriate for this course.
However, in an attempt to be less vague and unhelpful, I decided that a blog
was probably the best way to get my opinions and ideas across.
Kindergarten
I think I need to offer some context here. My first Degree
is not purely in electronics, but is shared with software engineering and
system development. Despite finding the systems and software aspects both
interesting and useful in my career, as time has gone on I have regretted not
having a deeper understanding of “pure” electronics, but there is only so much
you can fit into 4 years study. So, when the esteemed M.I.T. announced that it
was making one of their electronics courses available as “Open Courseware” then
it seemed the perfect match for my needs. A good time to brush up on forgotten
facts, and learn some new ones too.
I had already watched most of the recorded 6.002 “live”(i.e. recorded in a lecture theatre) lectures on YouTube and they seemed okay.
No better than that though, and certainly not up to the quality of WalterLewin’s MITphysics lectures. Given the
prestigious name of the institution and their reputation for ground-breaking
methods developed in the Media Lab, my expectation was that, as part of the
transition to on-line delivery, they would have taken time to prepare a clear
and thorough presentation of the subject, taking academic lectures to a whole
new level.
Open Courseware is Nothing New!
 Here in the UK, we have an institution called The Open University.
It was founded by the government in 1969 as "the university of the air" with the aim of making high quality
higher education available to everyone. One of the unique aspects of the O.U.
was the use of broadcast television in order to distribute lectures – remember
that in the 1960s and 70s virtually nobody had a video recorder.
Here in the UK, we have an institution called The Open University.
It was founded by the government in 1969 as "the university of the air" with the aim of making high quality
higher education available to everyone. One of the unique aspects of the O.U.
was the use of broadcast television in order to distribute lectures – remember
that in the 1960s and 70s virtually nobody had a video recorder.
Sadly, as time went on, the O.U. realised it could
distribute lectures on VHS cassette, then DVD, with the result that by 2000
virtually no academic programmes were being broadcast on free-to-air, just the
“fluffy” populist programmes with little academic rigour. I would really like
to see the O.U.'s back-catalogue of lectures available free on YouTube or
similar service. The technical quality may not be great (heck, many of them are
in black and white) but the content is exceptional.
I may be an engineer by profession, but I grew up in the
70s, 80s (and 90s) watching low budget but well designed programmes, not just
ones on physics and mathematics, but history, chemistry, art, languages,
literature… You get the idea. Lots of things. I didn’t understand all of it by
any means, but I feel it made me a better person, and it instilled in me a
hunger to learn. Free, high quality education changes lives for the better.
Even, or perhaps especially, the less advantaged parts of the world.
If I seem critical of 6.002x in this report, then it is from
a desire to see it work, and work well, and to foster the development of much
more open courseware. I know what effect the O.U. had, and the thought of what
MIT (together with Harvard, Stanford and the like) can achieve with MITx is one
of the most exciting things I have seen in a long time. It really does need
more work though. So, here we go. The criticism.
Presentation
Professor Agarwal is to be lauded for his work in making
this course available to the entire world, and I think his enthusiasm makes him
the ideal person to spearhead the open courseware movement. I have to be honest
though, and admit that his presentation style is not ideal in this particular context.
Note that I am not talking about his accent, although I can see how people
whose first language is not English may well be confused.
When I was at university (which to my horror I have realised
is now nearly 20 years ago and thus several generations in technology terms)
the lecturers would often use pre-prepared overhead projector (OHP) slides with
spaces to work through problems. This produced a nice linear work-flow which
made it easy to write clear and effective notes. The slides themselves were
also available later as photocopies for students who had been unable to attend
the lecture. I found it worked very well indeed both for learning and revision.
Think of it, if you will, as pre-written blackboards. The lecturer doesn't need
to spend time writing things down, so you can get on with the business of
actually learning.
The existing real-world 6.002 lectures take place in a
multi-hundred seat lecture theatre, with a conventional blackboard (chalk-board
to all the non-native English speakers). This retains some linearity but can
get messy, and the lecturer spends a considerable amount of time simply
s-l-o-w-l-y writing things down. A phrase which takes two seconds to say and
understand can take ten seconds to write.
However, rather than repeat the existing video lectures, MIT
have taken the decision to go with virtual slides; basically Dr Agarwal writing
on a screen via a graphics tablet. As you can imagine, each slide can get
rather cluttered and confused by the end of each lecture video. The flow,
rather than being in a linear sequence, is all over the place and useless forrevision.
The move to a web-delivered format should, in theory, enable
a more carefully crafted and controlled learning experience with a good flow
and clear graphics and animations. Instead, we have the lecturer writing on a
graphics tablet, over a tiny area. This is exactly the same content seen on the
black/whiteboard in the live lectures. The tiny area makes things get cluttered
very quickly indeed, and the thick “pen” used is rather unclear. The resultant
image is crammed into 674x379 pixels, as you can see above.
I appreciate that using a small screen size allows lectures
to be viewed on small hand-held devices, but it compromises the delivery of
those lectures, and at this stage we should not be looking at the lowest common
denominator but, instead, how current technologies might be used to improve the
presentation.
I’m afraid the lectures have the feeling of “oh bugger, I
forgot to prepare anything, I will do it as I go along”. You can get away with
this in real lectures, but for video presentation then I’m afraid it isn’t good
enough.
The very first presentation I gave in front of an audience
at university was hacked together in a couple of hours the night before, and I
hand-wrote many of the slides as I went along. I got a C grade for doing
enough, but the other students showed me that I should have prepared far better
than I had. These lectures have a similar feel to mine.
With all the resources of MIT, it must surely be possible
for someone to digest these lectures and present them in the form of mostly
pre-made slides? Some of the slides we see are partly pre-drawn, but get
cluttered very quickly (see above) and Prof. Agarwal has a habit of adding
unnecessary “fluff” and comments.
The original 6.002 lectures are recorded in a live lecture
theatre, the sound is generally crisp and consistent. I wish I could say the
same for the 6.002x version. Not only is the sound frequently muffled and
masked with rustling, but the audio levels vary massively, even within one
5-minute video. It is clear that they weren't being monitored during recording,
or even reviewed afterwards.
(Not) Recorded In Front of A Live Audience
I have just been watching an interview with the instructors
( https://6002x.mitx.mit.edu/section/instructor_interview/ ) and they raise
some relevant points which are largely unanswered among the “didn’t we do well”
mutual back-slapping. The main one is the important role that feedback plays in
lectures. Students point out mistakes, and a puzzled expression on several
faces can tell the instructor that their explanation is unclear, and thus
should perhaps be trying an alternative approach. This is never going to happen
when recording in a booth with a monitor and graphics tablet for company.
I'm afraid that Prof Agarwal gets into the habit of repeating
himself quite a lot. By the final lectures he was saying the same thing as many
as four times. This is annoying, wastes time, and breaks up the train of
thought. It could (and should) have been edited out. Recaps at the start of
every section just aren't needed when the student can click a button and see
the previous sub-lecture. When you are watching a sequence of lectures, it gets
really irritating to have a recap every 5 to 10 minutes.
Rate of Delivery
In the official introduction, we are told that we should be
spending around ten hours a week on 6.002x, including lectures, tutorials, lab
work and homework. To do justice to the subject, ten hours is probably somewhat
on the low side, especially if you are returning to formal education after
years away and need to do some catch-up work on the maths or whatever
(remember: you can't pause the course to revise another subject). At over 1000
pages, the course text book would take well over 10 hours a week to complete,
even if you were only doing a few of the exercises.
That doesn’t seem too bad does it, ten hours in a whole
week. Let me put it another way though. That is 25% of a full time job, or 1.5
hours every day. Let us assume that we
are unable to study one day. This means that we need to find three hours study
time the next day in order to catch up. Sadly, real world events happen and
these hours mount up, and it is horribly easy to get left behind. The chain
nature of the subject means that it is difficult to cut your losses and start a
new subject. The result is that it becomes impossible to catch up.
Unfortunately, this is what happened to me when a family member became ill.
This is always going to happen in the "real" world, more so than among
a group of full-time students without young (or elderly) families to look
after.
Rather than having two lectures per week and running for 13
weeks, I would run it at half that speed. Better still, why not have it
on-demand? If the need for regular testing is removed (see later in this blog
post) then I see no reason why a student could not progress at their own rate,
and do full justice to the subject, instead of having to gloss over parts
because of time restrictions. Mid- and end-of-term testing could still happen
at fixed quarterly intervals, with the student undertaking them only when they
felt confident to do so.
Testing, Testing, 1... 2...
Currently, testing is in two formats. Firstly, each week has
a set homework which must be completed within 2 weeks of being set. Labs are
effectively a second homework, with the same issue and completion dates. So far as I can see, there little policing of
homework answers on the official forum, and other web sites also contain discussion
about homework, with extensive worked answers for most of the questions.
It is perfectly possible for a student with no electrical
knowledge (but a whizz on Google) to be able to find the homework answers and
copy them over. In fact, most discussion seems to be along the lines of “I need
the answer to Hw7 Question 3”. The on-line chatter about 6.002x definitely has
the emphasis on passing tests rather than understanding the subject. I am aware
that there are groups of students out there who share sets of answers. The
result of this is going to be a set of students who know nothing about
engineering but who have an A grade in an MIT course. This utterly devalues the
brand, and is something MIT need to be aware of.
I think running the course asynchronously would help reduce
this reliance on copying, but I am afraid that it is going to be endemic in any
system like this, which relies on automated pattern matching rather than a
human being interpreting the submission.
I guess I was spoiled as a student. The emphasis was very
much on understanding how to solve problems. So, if you got the numerical
result incorrect, or made a mistake in one step along the way, you would still
get the majority of the marks. An engineer is someone who can tell you why
something works, and this testing system just doesn’t support that ethos. All
it wants is a number, or a line of preformatted mathematical text.
Talking of which, the method of submitting expressions is
horrible. The question setters do their best to allow for some flexibility, but
the software cannot take individual style into account when checking an answer,
whereas a human would not see it as an issue at all. I think it was week 5 or
6, which involved extracting MOSFET parameters via calculus. This resulted in a
horrendously complex expression entered as a line of text, which I must have
tried to enter a couple of dozen times before giving up (my calculation was
actually correct). The LaTeX mark-up language is supported in the labs, I don't
see why the homework system shouldn't support it too. Ideally the student could
write the answer (and intermediate steps) in longhand on paper, but this would
obviously not be machine-readable.
I noticed an excellent article on the BBC Education site
concerning this issue. MITx (and EDx) seem to be looking at a form of
peer-evaluation. This is an excellent idea if correctly carried out. Quite how
they are going to trust a set of random (and inherently uneducated and
inexperienced) individuals to score a paper, I am not quite sure. It definitely
has potential though.
Because of commitments, I was unable to take either
examination. I have heard several comments that people were surprised how easy
it was in comparison to previously published examples.
Labs
All labs are based around a simplified web-embedded PSPICE
client. This is good so far as it goes, but I was disappointed that an
engineering course lab didn’t have a physical aspect to it. I understand that
this would incur a potential cost on the part of the students, but I believe
this could be done inexpensively with a cheap breadboard and a small collection
of components. It need not be compulsory, but I am sure many students would
welcome the opportunity to understand electronics at a more physical level.
Either way, I would love to see more labs, whether virtual
or physical. Getting a real feel for how components work is vital for any
engineer. Just knowing that an Amp or a Volt is “so much” and “that much makes
a wire melt”. Too many paper engineers don’t have this sense of what is real.
Tutorials
Each weeks' lectures are accompanied by a small number of
recorded video tutorials. These may cover content from the lectures, or related
skills such as soldering. (Memo to Americans recording electronics videos: You
know how you laugh when we call a cigarette a fag? Well we do the same when you
pronounce soldering as soddering)
More tutorials please! These are the strongest part of the
course at the moment. If you want to see how they might be improved, go and
watch some of Dave Jones' EEVBlog tutorial videos on YouTube.
Course Text
The course set text is “Foundations of Analog and Digital
Electronic Circuits” by the lecturer (Anant Agarwal) and Jeffrey Lang . At 1008
pages it is certainly no lightweight book. It currently retails for £66 here in
the UK, excluding postage (approximately £3). That is US$107. Yeah.
To be fair, the entire book has been scanned in and is
available online on the 6.002x web site. You may be one of the fortunate souls
who can read books online with no problem, sadly I am not one of those people,
and printing 1008 pages doesn’t really appeal to me.
If the book weren't the official course text then I wouldn't
look at it twice. There are many better books out there, which present the
subject in a clearer and more methodical manner. I would go as far as to say
that basing the course on this book is holding it back.
The Emperor’s New Clothes and Education by Omission
I have seen various comments on web forums concerning
6.002x. Inherently, many are from students who were, for one reason or another,
unable to attend a “real” university. There is a certain amount of comment that
the lectures only cover a small proportion of the subject content. Quite often,
the response to their concerns it “it is MIT, one of the best engineering schools
in the world, of course it is difficult” or “the lectures give you the basic
tools, you are expected to do the rest”.
There is a certain amount of validity in this, where the
student is physically within the learning environment. In this case, however,
this approach simply isn't sufficient.Why not just buy the book and work
through the tutorials? 6.002x is no longer a physical university course where
students have multiple sources of support, and the existing lectures do not
provide sufficient information.
A few weeks ago, I was watching the excellent “Ask
AnEngineer” live Internet video programme, where (MIT alumnus) Limor Fried was
talking to (fellow MIT alumnus) Amanda Wozniak. Someone asked what they thought
of 6.002x. They both expressed surprise that MIT had chosen this particular
module as the first to be trialled. Amanda said she had nearly abandoned the
module half way through, as the maths was becoming overwhelming, and she was
really struggling. I have to say that I have a lot of respect for Amanda as an
engineer, she really knows her beans, and if she was struggling then heaven
help the rest of us.The maths rather overwhelmed me at the same point.
You can call stuff “a bunch of fun” as much as you like (and
Prof Agarwal never shies away from doing so) but hard work is hard work and
should be treated as such. If a student thinks they should be enjoying it and
are simply finding it impossible, then they may well quit. Engineering is hard.
Sure, it can be presented well, and explained from various perspectives, but
there is a lot to learn and no amount of "hey wow guys ain't this
cool" is going to make it quick and easy.
So... Tries hard. Could do better. But How?
I am not egotistical enough to assume that MIT give a rat’s
arse about my opinion, but I do think they will pay attention to the general
consensus. I also think that if nobody says anything then they will assume the
course as it stands is perfectly fine and will continue with it in the same
format. It is a good start, for sure, but it isn't fine. 4/10 at most.
Overall structure.
- Remove the examinations (for reasons of mass-cheating mentioned above). Without having a real physically moderated examination, where the student is required to attend a controlled environment, I think they are ineffective and serve only to devalue the course, and MIT’s qualifications as a whole.
- This can be balanced by having more coursework. The only “qualification” on offer should be a certificate stating that the student has attended all the lectures and passed the homeworks.
- Crucially: Deliver the course flexibly and on-demand, with no time limits. Allow the student to start when they want and to progress at their own speed.
- More of the excellent tutorials.
Technical quality must improve vastly.
Let me state at the start; Budget is no excuse for poor
quality.
The audio must be clearer and more consistent in volume. If
MIT’s broadcast facility won’t allow you to use their equipment then
inexpensive semi-pro equipment such as the $100 Samson C01U studio microphone
is excellent quality. Software such as Audacity allows the levels to be
normalised within seconds at the click of a mouse. This is supposed to be
professional. If the quality isn’t good enough then re-record it! Choose a good
bit-rate too, there is some awful compression distortion on some parts.
I won't even call the existing quality amateurish. If anyone
at MIT wants to see how good lectures and teaching sessions can be, then please
look around YouTube.
The method of using a graphics tablet to write on the screen
is horrible. Worse in terms of readability than the live lectures, and very
wasteful of time. Pre-prepare a full set of clear slides at a good resolution.
Having written a book on this subject, a set of slides should not be difficult.
Yes, this takes time and effort. If you want to give a quality educational
course and don't want to do the work, then let someone else do it instead. In
the spirit of Open-ness I am almost inclined to make a set of animated slides
myself, just to show what can be done even with my mediocre skill in
presentations.
If need be – script it! This is basically a broadcast TV
show now. Ums, errs, aaaahs and repetitions are utterly unprofessional.
Absolutely fine in lectures, but not in this context.
Avoid clichés like the plague (yes I really did say that).
Avoid calling things “a bunch of fun” or “exciting”. Interesting maybe, but not
fun. Remember you are talking (partly) to teenagers who have recently
discovered alcohol, sex and really loud music. Possibly even all three at the
same time. Is power rail bounce or signal reflection really fun? I'm not
getting all Puritan here, it just really annoys me when someone tries to hype
something up which is clearly rather dull.
UK people will know what I mean when I say it gets a bit
happy-clappy vicar with a guitar and tambourine. the more you try to "get
down with the kids" the further away you push them.
The book. It needs to be available in print form for under
£30. There are on-demand print services (not to mention dubious sources in
China and India) who will print it for a fraction of that, if the will is there
from MIT and the authors.
There is content missing or lacking in detail, and content
which could more logically be located in a subsequent course. (For instance:
What happened to bipolar transistors?) This must be the only course I know of
which teaches active components before passives. I don't buy the "because
it is MIT then it must be right". My alma-mater has Nobel prizes too, and
they don't teach electronics in this rather muddled order.
Edit and edit again! Edit the script. Edit the videos and
audio.The final few lectures on power rail bounce and signal reflection could
have been edited down to 75% of the time or less, with no loss of content. At
one point, Prof Agarwal said the same thing four times. Yes four times. He said
the same thing four times. Isn't it bloody irritating and a waste of time when
someone says the same thing four times?
Conclusion
All good experiment write-ups should have a conclusion, so
here we are.
- Was it worth my time? Yes, definitely.
- Would I do it again? Not unless the video lecture content is massively improved.
- Would I do another similar online academic course? Unreservedly yes.
- Would I recommend it to someone looking to study electronics? Maybe. I suspect it would put a lot of people off serious engineering.
I really enjoyed getting my brain working again, remembering
long forgotten facts and learning a lot of new stuff. I also learned that I have forgotten a
huge amount of maths. It did soak up a huge amount of my spare time though, and only part of that was watching the videos and working on the assignments.
With the introduction of edX, which will effectively be covering all the MITx content now, and the promotion of Prof Agarwal, I suspect 6.002x may well change before the next offering. Hopefully this bringing-together of skills and services will raise the quality of content and delivery.
With the introduction of edX, which will effectively be covering all the MITx content now, and the promotion of Prof Agarwal, I suspect 6.002x may well change before the next offering. Hopefully this bringing-together of skills and services will raise the quality of content and delivery.
With such big names getting serious about Open Courseware, this entire field is going to get very big indeed.On a human scale, it is going to have a huge impact. Possibly even bigger than people yet realise.
23 March 2012
R.I.P. LCD. Hello OLED?
Organic LED (OLED) technology is one of those things that seems to have been on the way for years. It was going to replace LCD tech at a sweep, with ultra sharp, high contrast goodness. Like many such things, it never managed to take the world by storm, but it still has it's own advantages and disadvantages. I have kept meaning to investigate OLEDs for a while so (with one eye on the LCR meter project) I finally got my finger out and blagged a Densitron DD-12864YO-3A from Farnell Element-14.
Yeah, memorable name. You might guess though, that it is 128x64 pixels, and (monochrome) yellow. I'm used to conventional LCD modules, where a 128x64 might be 100x50mm (4in x 2in) and I had read the data sheet, but I don't think I was ready for quite how small this wee beastie is:
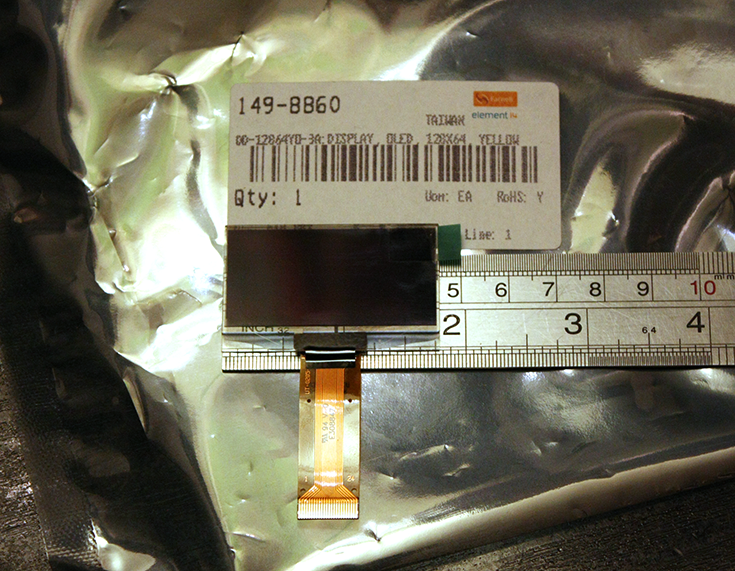
This instantly raises an issue over the form factor. I guess it is technology intended for mobile phones, but for practical hand held test gear I think it is just a bit too small. You can get 256x64 units which are approximately twice the width, but they are twice the price too, and well into the territory of colour LCD with integrated touch panel.
I had intended to hack this straight into an Arduino or Mbed, and get a quick demo running, but a few things have stopped me. See that connector in the photo above? 24 pins, each half a millimetre apart - clearly influenced by it's mobile phone background. None of this standard 0.1" header LCD here! Even with the matching socket, it really needs a custom PCB to break out the lines. Fear not though, I have a cunning plan, which involves a load of 30AWG (0.4mm) Kynar wire.This alone is going to slow down take-up when it comes to amateur projects and even professional prototyping. Secondly, though, the module is 3.3V only. No 5V here, no sir. A few resistors should sort that problem out, but it all adds up. Having said that, I don't know of any commercial systems that run 5V any more, so it is no big issue for non-Arduino folks.
One part of the manufacturer's data informs me that I need an externally generated 12V supply, but another part tells me that it can be generated internally. We shall see.
Looking at the pinouts, it seems like it is an adaptation of the classic HD44780 chip. It isn't. It uses an SSD1305 which does waaaay more than the old chip. Unfortunately this means it takes a lot more driving too. Just booting it up takes a fairly hefty code sequence. The user can elect (by variously grounding 2 pins) to use a classic 8bit 68xx or 80xx parallel protocol or, more interestingly, use 4-wire SPI or 2-wire I2C. If the manufacturers had desired, they could have easily halved the pin-count by going serial only, and removing three "No connection" pins that they insist should be grounded. I'm sure the market for breakout boards with a boost power supply and a level converter is already out there.
So, this looks like an interesting little adventure. I can think of a few projects where a module like this would be useful, not least my JTAG adaptor. It is definitely the sort of thing I will bear in mind for future designs, possibly filling in for indicator LEDs rather than low current LCD (the OLED unit draws up to 55mA). I hope to have some shots of a demo up soon.
Thanks go out to Farnell Element-14 for supplying the Densitron DD-12864YO-3A.
Yeah, memorable name. You might guess though, that it is 128x64 pixels, and (monochrome) yellow. I'm used to conventional LCD modules, where a 128x64 might be 100x50mm (4in x 2in) and I had read the data sheet, but I don't think I was ready for quite how small this wee beastie is:
This instantly raises an issue over the form factor. I guess it is technology intended for mobile phones, but for practical hand held test gear I think it is just a bit too small. You can get 256x64 units which are approximately twice the width, but they are twice the price too, and well into the territory of colour LCD with integrated touch panel.
I had intended to hack this straight into an Arduino or Mbed, and get a quick demo running, but a few things have stopped me. See that connector in the photo above? 24 pins, each half a millimetre apart - clearly influenced by it's mobile phone background. None of this standard 0.1" header LCD here! Even with the matching socket, it really needs a custom PCB to break out the lines. Fear not though, I have a cunning plan, which involves a load of 30AWG (0.4mm) Kynar wire.This alone is going to slow down take-up when it comes to amateur projects and even professional prototyping. Secondly, though, the module is 3.3V only. No 5V here, no sir. A few resistors should sort that problem out, but it all adds up. Having said that, I don't know of any commercial systems that run 5V any more, so it is no big issue for non-Arduino folks.
One part of the manufacturer's data informs me that I need an externally generated 12V supply, but another part tells me that it can be generated internally. We shall see.
Looking at the pinouts, it seems like it is an adaptation of the classic HD44780 chip. It isn't. It uses an SSD1305 which does waaaay more than the old chip. Unfortunately this means it takes a lot more driving too. Just booting it up takes a fairly hefty code sequence. The user can elect (by variously grounding 2 pins) to use a classic 8bit 68xx or 80xx parallel protocol or, more interestingly, use 4-wire SPI or 2-wire I2C. If the manufacturers had desired, they could have easily halved the pin-count by going serial only, and removing three "No connection" pins that they insist should be grounded. I'm sure the market for breakout boards with a boost power supply and a level converter is already out there.
So, this looks like an interesting little adventure. I can think of a few projects where a module like this would be useful, not least my JTAG adaptor. It is definitely the sort of thing I will bear in mind for future designs, possibly filling in for indicator LEDs rather than low current LCD (the OLED unit draws up to 55mA). I hope to have some shots of a demo up soon.
Thanks go out to Farnell Element-14 for supplying the Densitron DD-12864YO-3A.
14 December 2011
Arduino - DIY Electronics for the 21st Century?
Over the past year or two, it has felt like you can't turn a page in a tech magazine, or read a web page about electronics without some reference to the Arduino. Somehow it seems to have moved from serious "difficult" electronics, into an everyday commodity.
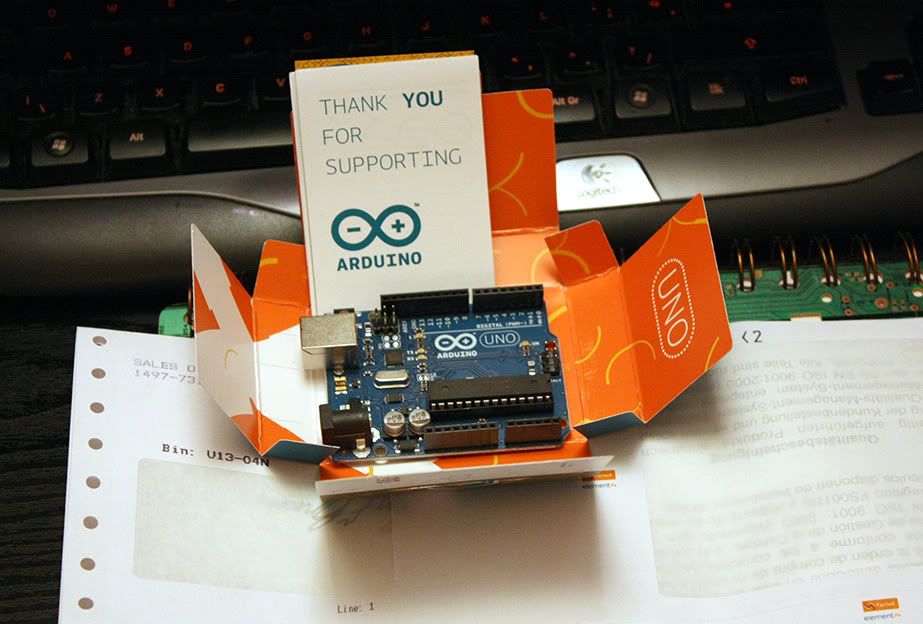
Thus far, I had resisted the Arduino's allure. I don't have any experience with Atmega processors, my usual preference is for one of the Microchip PIC families or, if more power is needed, an ARM cored device. But how could I give an opinion without owning one and having a play around with it? I was impatient as usual, and the people at Farnell / Element-14 had one sitting on my desk within 24 hours. Excellent.
I will go into more details later, but here is a quick rundown.
The Arduino Uno is a totally open source embedded development board, based around the Atmel Atmega328. Other "flavours" of Arduino are available, usually based around other Atmega chips. Arduino isn't just limited to the hardware, however. It also covers the development environment which, to my mind, is the crucial factor in it's success.
As you can see from the screen grab above, this isn't Microsoft Visual Studio. Thank goodness. Simple and clean with syntax highlighting. This is why Arduino has taken off.
The Uno itself measures just 53x69mm, and arrives in a simple cardboard box that looks more like a packet of cigarettes or condoms. No. Really. The accompanying leaflet covers the usual legal disclaimers and little more. It would be nice if it said "Congratulations on your new Arduino, now download your free development software from www.arduino.cc" or similar.
It is powered via the standard USB "B" socket, or via a jack socket. I find it odd that they haven't moved over to a mini or micro USB, but no great shakes. The general standard of construction is solid, as you might expect with a mature product, the CPU being a socketed 28-pin DIP/DIL device. This is so you can remove it after programming, or plug it into a breadboard. Or, I suppose, replace it if you toast it.
There is a HUGE amount of resources for the Arduino around the Internet. Almost too many. If you are interested in seeing what it can do, and how easy it is to use, then I recommend Jeremy Blum's YouTube series here.
I got mine from Farnell / Element-14, who stock a range of Arduinos and related gear.
The Arduino Uno I reviewed is available here http://uk.farnell.com/arduino/a000046/board-arduino-uno/dp/1848687
Arduino's home is at arduino.cc
John's Tronix Stuff tutorials here.
Additional: If anyone has any good Arduino tutorial sites they would like me to add, simply add a comment or drop me a line.
Thus far, I had resisted the Arduino's allure. I don't have any experience with Atmega processors, my usual preference is for one of the Microchip PIC families or, if more power is needed, an ARM cored device. But how could I give an opinion without owning one and having a play around with it? I was impatient as usual, and the people at Farnell / Element-14 had one sitting on my desk within 24 hours. Excellent.
 |
| The Arduino Uno |
I will go into more details later, but here is a quick rundown.
The Arduino Uno is a totally open source embedded development board, based around the Atmel Atmega328. Other "flavours" of Arduino are available, usually based around other Atmega chips. Arduino isn't just limited to the hardware, however. It also covers the development environment which, to my mind, is the crucial factor in it's success.
 |
| The Arduino Development Environment (Click for larger image) |
As you can see from the screen grab above, this isn't Microsoft Visual Studio. Thank goodness. Simple and clean with syntax highlighting. This is why Arduino has taken off.
The Uno itself measures just 53x69mm, and arrives in a simple cardboard box that looks more like a packet of cigarettes or condoms. No. Really. The accompanying leaflet covers the usual legal disclaimers and little more. It would be nice if it said "Congratulations on your new Arduino, now download your free development software from www.arduino.cc" or similar.
It is powered via the standard USB "B" socket, or via a jack socket. I find it odd that they haven't moved over to a mini or micro USB, but no great shakes. The general standard of construction is solid, as you might expect with a mature product, the CPU being a socketed 28-pin DIP/DIL device. This is so you can remove it after programming, or plug it into a breadboard. Or, I suppose, replace it if you toast it.
There is a HUGE amount of resources for the Arduino around the Internet. Almost too many. If you are interested in seeing what it can do, and how easy it is to use, then I recommend Jeremy Blum's YouTube series here.
I got mine from Farnell / Element-14, who stock a range of Arduinos and related gear.
The Arduino Uno I reviewed is available here http://uk.farnell.com/arduino/a000046/board-arduino-uno/dp/1848687
Arduino's home is at arduino.cc
John's Tronix Stuff tutorials here.
Additional: If anyone has any good Arduino tutorial sites they would like me to add, simply add a comment or drop me a line.
7 December 2011
Tektronix DMM4020 Bench-top Digital Multi Meter - First Impressions
This is an initial overview of the Tektronix DMM4020 Bench-top Digital Multimeter.
This overview was originally written for Element-14 and is available here.

Unit Price: £528.00
I must stress that this is just an initial overview. The DMM4020 is very much a professional piece of test equipment and needs to be used properly in a work context for some time before I can give a thorough in-depth review. Nevertheless, in the short time that I have had it, I have already learned more than enough to give a good overview.
A few month ago, I had considered that a good bench meter should really go on my list of test gear. Less than a week after its arrival, I wonder how on earth I managed without one. After all, hand-held multimeters are really good now and - it has to be said - more than good enough for most work. So why has a bench meter already earned its place in my lab? Read on…
The meter arrived in sturdy double-layer manufacturer’s box measuring 9”x12”x17”. Inside is a pair of vacuum formed foam blocks which sandwich the meter and provided good impact protection on its journey here. It is the sort of packaging that is worth keeping for storage, should you need to move it around or keep it safe.
Unless you have a huge bench or a permanent place in a rack, then this meter does take up quite a bit of space, being 9 inches wide and 13 inches front-to-back (although it is tiny in comparison to the high end calibration lab stuff). Traditionally though, bench gear like this does appreciate being left switched on permanently, to allow the temperatures to stabilise, minimise thermal cycles and prevent any moisture affecting components as the lab cools down over night. Unfortunately the DMM4020 has a fluorescent display, which has a tendency to fade when left on for extended periods (years). I have not yet discovered a way to turn the display off whilst keeping the electronics running. There is a “soft” power button on the front panel which may well perform a similar function. That is definitely something to investigate. Otherwise, though, the VFD is bright, sharp and fast to react, probably better than LCD could give.
However, this is jumping ahead slightly. The very first thing that I saw – a printed manual. Yes folks, real paper, with print on it. Spiral bound. Hallelujah! Only 26 pages of it are in English (the rest is Japanese and Chinese). It is only a “Safety And Installation” Manual, but it covers the main functions and accuracy tables. The full User Manual is 110 pages but unfortunately only available in PDF format. I will go more into the contents of this manual in the full review. The S&I manual states that power consumption averages 10 Watts, with a maximum of 15 Watts. Each side of the case is plentifully supplied with ventilation holes, and having left the DMM4020 on for 6 hours, the temperature stabilised just above ambient. It runs very cool indeed for mains powered gear.
Caution!
There are two things to watch out for before you start. Most importantly, the DMM4020 uses a conventional transformer power supply which is supplied configured for 110V.
It takes until page 10 of the Installation Guide before it mentions line voltage selection. I imagine almost all users will know to check this first, but in a world where people are increasingly used to switched mode power supplies that take 100-240V without configuration, a caution sticker would probably be wise. The actual method of voltage selection is a bit odd but nevertheless functional; You unclip and remove a module which has the mains fuse and a plastic “spider” inside, which is rotated to suit 100, 120, 220 or 240V and re-inserted. Despite having a mains transformer, the unit only weighs a modest 2.1kg
Secondly, the supplied mains cable has a US standard plug. This is not a problem though, as the connector is a standard IEC “kettle lead” and most labs have plenty of those hanging around! The DMM4020 does have a set of stand-off feet moulded into the rear of the case, which allows it to be operated vertically rather than in the conventional horizontal manner. Unfortunately the supplied mains lead is a “straight through” rather than a 90 degree elbow, and so if you try to stand the meter upright, whether against the floor, desk or slotted into a rack, it sits on the cable rather than the feet, and so is unstable. Note to Tektronix : Supply a 90 degree "Elbow" power lead please!
One thing which is really good to see – a proper mains on/off switch mounted next to the power connector. So far as I can see from looking through the ventilation holes, this is a proper switch which isolates all internal components.
Construction
Internally
I don’t intend to take the DMM4020 apart, not least because that would entail breaking the calibration seals, which I am loathe to do. Fortunately, however, you can get a pretty good view of the insides just by looking through the ventilation slots. This is very much a unit for a clean lab and not a dusty shop floor which would risk contaminating the sensitive electronics in no time.
Visible in the middle off the board is the heated precision voltage reference, clearly labelled LM399H with a National Semiconductor logo. A well known and well respected precision voltage source, used in several meters in this market segment. Interesting that they didn’t choose an LM199 or LM299 which seem to be 2% initial tolerance versus the LM399’s 5%, although it has to be said that after calibration there is little difference. I suspect that putting the unit into standby from the front panel will keep the heater running inside the voltage reference whilst powering down the display and processor. This would seem an ideal compromise.
In use.
As you can see from the front panel, the Tektronix DMM4020 is a 5 ½ digit unit, with separate connections for low (200mA) and high current (10A) ranges. It is also capable of full 4-wire resistance measurement, although only a pair of Tek TL710 conventional probes are supplied. Supplied probes are usually low budget affairs, but these are really nice sharp Cat III/Cat IV 10A probes with finger shields. However - no ground clip is provided! This is definitely an oversight in a meter of this stature.
One feature I will certainly be looking at is the ability to take two measurements at the same time, or sequentially. Some meters can perform functions such as AC voltage + Frequency, but not many can perform current + voltage measurements together, or DC+AC, such as might be used to monitor power supply ripple.
You will note that it does not measure inductance or capacitance. I guess at this end of the market you would be expected to purchase a separate LCR meter.
Performance
These are the easiest to quantify in hard numbers. All this data is copied from the official (copious) Tektronix information, boiled down into the main points. I will go into more depth in the main review:
Measurement Speed
The DMM2040 can measure at 2.5, 20 or 100 samples per second. Normally 2.5 is perfectly sufficient, and 20 cannot be distinguished by human eye. However, this is good for capturing short transition events, or for high speed logging via the computer link. In the faster two modes, however, precision is truncated by one digit.
DC Voltage
Maximum input: 1000V
Input bias current: <30pA @ 25C
Input impedance: >10G Ohms (200mV and 2V ranges) 10M Ohms (20/200/1000V ranges)
Resolution on 200mV scale: 1uV
Accuracy: +0.01% of reading + 0.003% of range
Input bias current: <30pA @ 25C
Input impedance: >10G Ohms (200mV and 2V ranges) 10M Ohms (20/200/1000V ranges)
Resolution on 200mV scale: 1uV
Accuracy: +0.01% of reading + 0.003% of range
AC Voltage (True RMS)
Maximum input: 1000V peak, 750V RMS.
Accuracy (all ranges 45Hz – 20kHz): 0.15% of reading + 0.05% of range
Accuracy (all ranges 45Hz – 20kHz): 0.15% of reading + 0.05% of range
DC Current
Input protection: 11A/1000V and 440mA/1000V fuses
Shunt resistance: 0.01 Ohms (2A and 10A ranges)
1 Ohm (20mA and 200mA)
1 Ohm (20mA and 200mA)
Resolution: 200uA scale: 1nA (yes, that’s 1 nanoAmp)
Accuracy: typ. 2mA scale 0.015% of reading + 0.005% of range
Accuracy: typ. 2mA scale 0.015% of reading + 0.005% of range
AC Current:
AC Filter Bandwidth: 20Hz – 100kHz
Maximum Crest Factor 3:1 at full scale
Resolution: 20mA scale: 0.1uA (100nA)
Accuracy: Typ. 200mA scale, 45Hz-2kHz: 0.25% of reading + 0.05% of range.Maximum Crest Factor 3:1 at full scale
Resolution: 20mA scale: 0.1uA (100nA)
Resistance
Specification for 4-wire function or 2-wire with REL (relative measurement)
Input protection: 1000V on all ranges
Resolution: 200 Ohm scale : 0.001 Ohm (1 milli-Ohm)
Input protection: 1000V on all ranges
Resolution: 200 Ohm scale : 0.001 Ohm (1 milli-Ohm)
Frequency:
Range: 20Hz – 1MHz, for input >100mV
Accuracy: 0.01%
Accuracy: 0.01%
Continuity:
Threshold: 20 Ohms
Test current: 1mA
Test current: 1mA
Unseen performance
So much for the book data. With less than a week’s use, it is safe to say that I haven’t even scratched the surface on what the DMM4020 can do, but I have found some very nice functionality that most users just wouldn’t notice unless they were looking for. Specifically:
Diode test.
Most diode test functions only work at 1-1.5V, enough to test ordinary signal diodes, but not enough to test LEDs. The DMM4020 reads up to 1.9999V and drives up to 0.8mA, sufficient for the LED to light quite brightly. In theory this is only enough for red /yellow/green LEDs, but in practise the unit will illuminate blue and white LEDs also, which I was not expecting, although it will not give a voltage measurement for these.
Zero-burden Microammeter.
Most engineers will be aware that the usual way of measuring current is to insert a small resistance into the circuit and measure the voltage drop across it. At low currents this can be quite a high resistance, leading to a “burden” voltage drop which is unacceptable and may even upset the circuit under test.
The correct way to do this is with a transimpedance amplifier which provides almost no voltage drop, but can only realistically be performed at low current levels. It is quite a complicated thing to get right in a design and, as a result, is only usually seen in expensive dedicated microammeters. The Tektronix DM4020 is the only meter that I know of (this side of £1000 anyway) which uses this preferred method for measurement. If you often measure low currents, this feature alone may be worth the price of the meter.
Relay Range Switching.
In order to switch in appropriate shunts and multipliers, the DMM4020 uses proper electromechanical relays rather than silicon switches. This slows down auto ranging, but not unacceptably so. Manual override is always available and is probably preferred in most cases. Relay switching is by far the best method in equipment where you are looking for measurement performance and have the luxury of a large PCB real estate and a mains power supply.
“Other Stuff”
The supplied LabView software is a little clunky to install (and partially deactivates after a preview period) but does work pretty well. I am no LabView expert, but I can see how relatively easy it is to automate tasks if you are working in a production environment. This is definitely one thing I will be looking more closely at. Simply logging data in ASCII format to a text file is very handy indeed.
In order to connect the DMM4020 to the outside world, it is fitted with a standard RS232 port at the rear. Tektronix thoughtfully provide an RS232-to-USB adaptor, with a good 2M of cable. This seems to be based on an FTDI chip, which in my experience has proven most reliable in this sort of role. Windows 7 picked it up straight away and downloaded drivers via Windows Update.
Conclusion
So there we are. Four days use and a “quick” look that is already several pages long. That gives you an idea about what sort of machine the Tektronix DMM4020 is, I hope that I have at least been able to give a taste of what this machine can do. I hope to have a much more in-depth review up in a few weeks, after it has had some use in a real world situation. One of the things I have lined up is the development of my LCR meter project. Having a meter this accurate will help immensely.
A Request
I want to shoot some video of the DMM4020 in action if I can. At the moment I only have a webcam and a cheap compact camera that will shoot video, so I am looking to buy myself a reasonable 720 or 1080 digital video camera. Does anyone have any recommendations? I don’t want to spend more than maybe £150 or so, it doesn’t need to be a fantastic spec. Thanks!
Additional: Farnell / Element-14 tell me that UK purchasers will have their meter pre-configured for UK 240V power.
Subscribe to:
Posts (Atom)